Classic Audi » Community » General Chat » Seat foam rebuld write up, possible

Reply
 
Thread Tools Display Modes
Old 14-06-20, 08:49 PM   #11
Davids
4 ring whore!
 
Join Date: Jan 2017
Posts: 3,124
Default

Gently lever back the spikes but be careful they don't break off, you will stab yourself and swear out loud


Carefully pull the black cover back from the base, this stuff is really sticky and I gently cut it as close to the material as possible as it was going to tear the material.
I found it sticky enough when putting it back together that it worked without any new stuff needed.


This end of this it held in the base with some plastic clips, there should be a middle bit to each prong but they snapped off on removing this no matter how gentle I was. I guess this is the beginning of single use plastic trim and clips
Davids is offline   Reply With Quote
Old 14-06-20, 08:59 PM   #12
Davids
4 ring whore!
 
Join Date: Jan 2017
Posts: 3,124
Default

On this coupe seat cloth, and I guess with any this age will be the same you have to release it from 2 clips and about 4 spikes that are hidden, I couldn't see the first 2, so if it wont peal back gently over the foam then there is still a spikey stabby thing holding it.
Again careful and these are the only things that hold that cloth onto the frame.


Pull the material out of this clip, one each side


Cloth out and spike hiding to the left, gently straighten them out


Spikey stabby bstd to the right of the clip


Hiding just to the right of the screwdriver


Back by the hinge the rear of the cover is held on with this soft listing wire tucked in as seen. Gently straighten it out and pull out the frame.


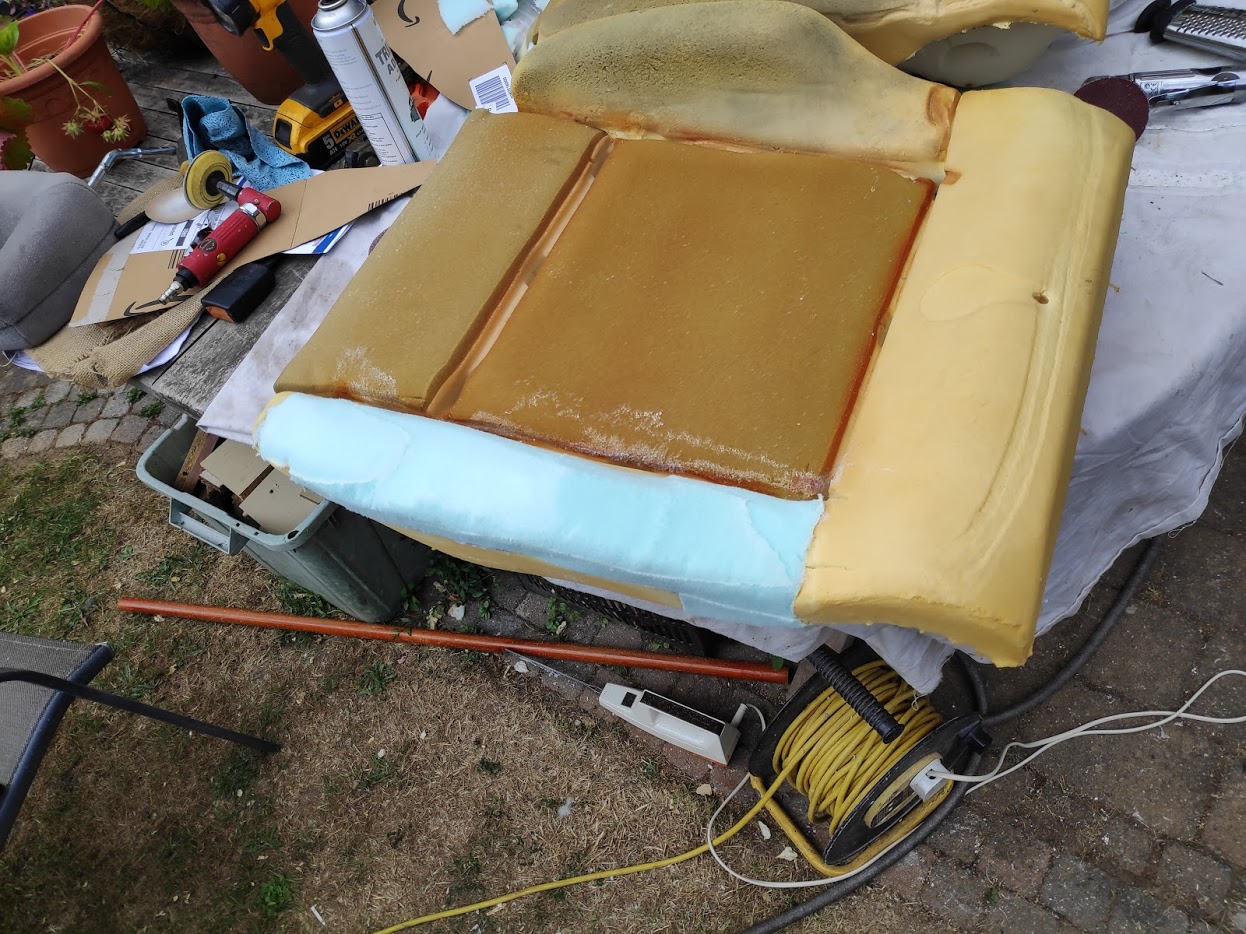
And you should be able to lift the foam and cloth off the base.
The cloth is still attached to the foam at the moment, DONT TRY AND PULL IT OFF YET
Davids is offline   Reply With Quote
Old 14-06-20, 09:13 PM   #13
Davids
4 ring whore!
 
Join Date: Jan 2017
Posts: 3,124
Default

This is why the foam collapses, the little piece of plastic is meant to support the foam while some big ar&e is lumping down on it over the life time of the car, this bit of plastic is sitting on top of the side bolster support, a bit of 10mm rod, it was made to fail.


This is the foam with the cloth removed, the reason I have shown this first is to explain that the cloth is held in the middle on the 4 sides you can see. In the cloth is a listing wire, welding rod to you lot, this is then held to the listing wire which is cast in the foam base, the pair are joined together with hog rings.


The hog rings will be tucked in tight into the seams where the cloth and listing wires meet, don't pull them too hard as you can tear the material, and you need the material again to refix with new hog rings


Just make sure to remember which listing wire went down first, I think my front and back went first and sides overlapped them at each end, and if the material wont come off the seat there is a hog ring somewhere
Davids is offline   Reply With Quote
Old 14-06-20, 09:21 PM   #14
Davids
4 ring whore!
 
Join Date: Jan 2017
Posts: 3,124
Default

The next bit, cutting the foam is really, well work out where you can get the biggest areas of new foam stuck together and go for it. Its a job to explain. With the base I cut the side bit off and stuck a new piece where the bolster would go, this way I had the biggest surface area of one piece of foam, rather than 2 bits stuck together if you see what I mean.
I had to be careful as you have to leave that sort of slot for the side bolster support wire to slot up into to give the side bolster its shape and support, hopefully the pics are better than my explanation.
And the best thing to cut this is the carving knife, Stanley knife and all that don't work, an old trimmer told me about this, and it works.


Davids is offline   Reply With Quote
Old 14-06-20, 09:28 PM   #15
Davids
4 ring whore!
 
Join Date: Jan 2017
Posts: 3,124
Default

Couple of things about sticking foam, you don't need lots of coats, I found just a single light pass from an aerosol on both bits worked fantastic, and it doesn't come apart at all, have to get it right first time.

Also if a bit of the existing foam is broken or breaking up just cut a square out and stick in a new bit. Just leave a bit for sanding and trimming.

And yes, the fine cheese greater worked perfectly, use it much the same as sanding filler, don't try and get it perfect like filler, it just has to be the rough shape as it supporting the material that's all.


Starting to get shape


I did have a go with an air sander, rips it off at a massive rate, be careful, looks easy on youtube, not so easy in real life.


Davids is offline   Reply With Quote
Old 14-06-20, 09:34 PM   #16
Davids
4 ring whore!
 
Join Date: Jan 2017
Posts: 3,124
Default

To give the side bolster some support I stuck burlap into the area where the seat side bolster wire support goes, you can use leatherette, or anything that will give this some support as its almost impossible to stick the plastic back in. I have read about someone using plastic conduit etc but this worked fine, and made this area very strong.


The other thing that can be done is to firm up the existing foam with some new stuck on the top. Because the cloth seemed a tight fit anyway U used some 1/4" foam and just stuck it on the existing. Cut it clear where the listing wires go as you will need to get in there later on to re-join the cloth

Davids is offline   Reply With Quote
Old 14-06-20, 09:40 PM   #17
Davids
4 ring whore!
 
Join Date: Jan 2017
Posts: 3,124
Default

more tomorrow
Davids is offline   Reply With Quote
Old 14-06-20, 09:45 PM   #18
urquattr085
Senior Member
Classic Audi Club Member
 
urquattr085's Avatar
 
Join Date: May 2016
Location: Displaced Northerner in Essex
Posts: 1,528
Default

Loving the write up mate, great work......many thanks.

Anticipating the next installment
__________________
1985 WR quattro
2010 A6 3.0Tdi Allroad

2010 A3 1.4 tfsi Sport - Sold but still in the family
1984 80 Quattro - Sold many moons ago
1981 Coupe GT - Sold to buy above
urquattr085 is offline   Reply With Quote
Old 14-06-20, 10:54 PM   #19
slacky
4 ring whore!
Classic Audi Club Member
 
slacky's Avatar
 
Join Date: Nov 2007
Location: wirral
Posts: 4,452
Default

This is great , thanks for sharing
__________________


90q-Cab.
2.3E-Ur-S6
-b2-80 Sport
Member 111
slacky is offline   Reply With Quote
Old 15-06-20, 06:51 AM   #20
Davids
4 ring whore!
 
Join Date: Jan 2017
Posts: 3,124
Default

Fixing the seat base cloth back on you will need these, hog rings and the pliers that fit these.
I did try making my own, then using ordinary pliers when we restored the Mustang, nope doesn't work, these make it so easy, and 100 hog rings £4.99.


The hog ring locates in a slot in the pliers and these bend and curl the ring correctly. I have seen others use cable ties but when you have a deep listing wire you cant get in with 2 hands to get the cable ties end out.
Davids is offline   Reply With Quote
Reply

Bookmarks


Posting Rules
You may not post new threads
You may not post replies
You may not post attachments
You may not edit your posts

BB code is On
Smilies are On
[IMG] code is On
HTML code is Off
Forum Jump


All times are GMT. The time now is 08:10 PM.

Powered by vBulletin®
Copyright ©2000 - 2024, Jelsoft Enterprises Ltd.
Copyright ©2007-2008 Classic Audi | Site by Roadrunna